Your first project
The workspace on its own is a fine scratch space, but LatchAI gets interesting when you point it at a repository you already work in. That is what mounts are for.
Add a folder to the workspace
Section titled “Add a folder to the workspace”A mount is a folder from anywhere on your machine, declared in mounts.json and managed
from the Code sidebar’s + button (or the /api/mounts endpoints). The mount’s name
becomes a virtual top-level directory: the file explorer, editor tabs, and every agent
tool see it through the same multi-root filesystem and the same permission gate, and
nothing outside the workspace and its mounts is reachable.
Open Code in the activity bar — it is the first entry, under Development — and use one of the two buttons in the sidebar header:
+opens a native folder picker (macOS).✎takes a typed path —~is expanded — for headless daemons and everywhere else.
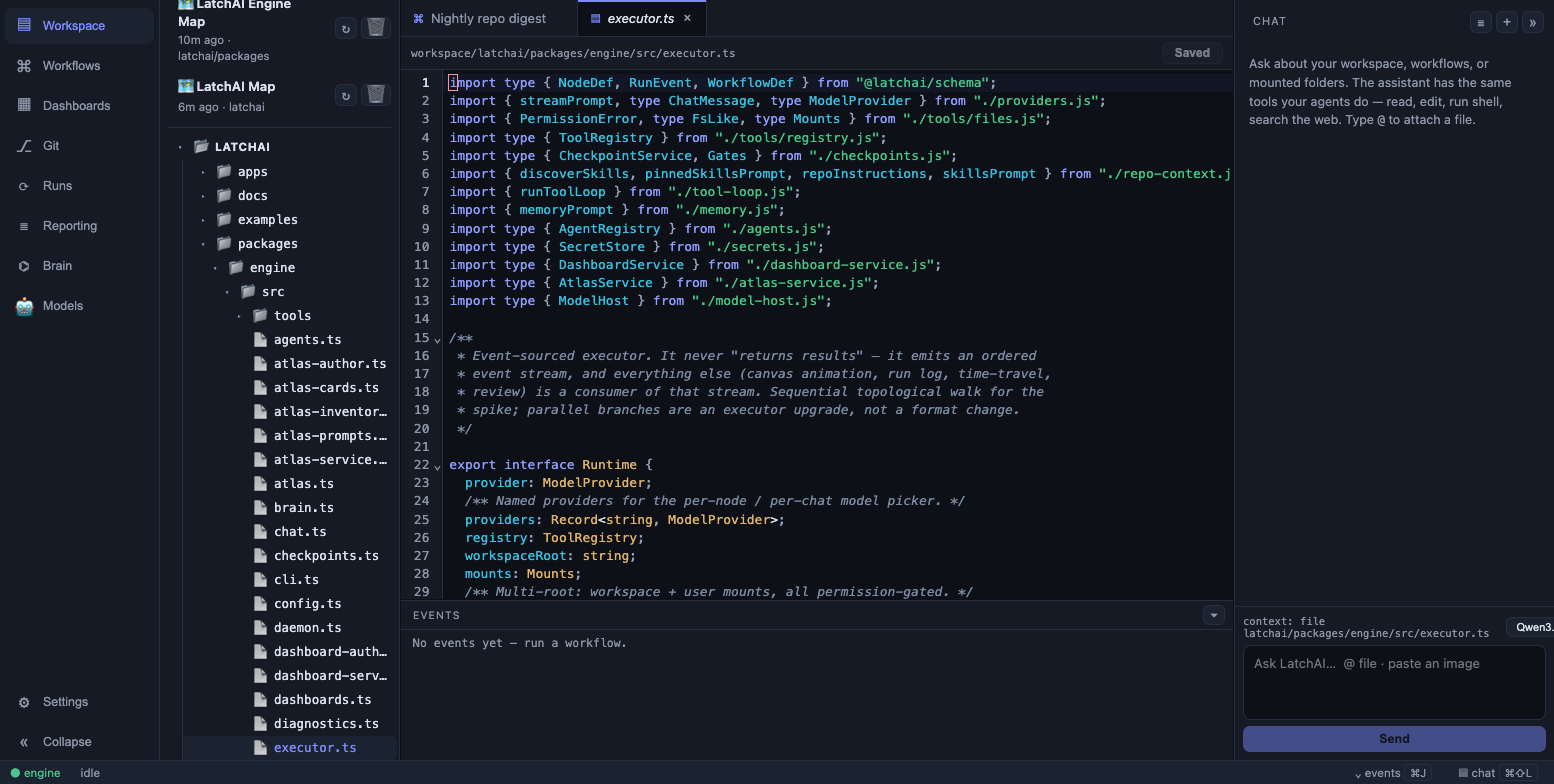
A mount appears as a top-level folder beside workspace/.
The mount is named after the folder’s basename, with anything outside [A-Za-z0-9_.-]
replaced by _; a name that’s already taken gets a -2 suffix rather than clobbering the
existing mount. Adding a folder that is already mounted does nothing rather than mounting
it twice. The result is one line in <latchHome>/mounts.json:
{ "myrepo": "/Users/you/repos/myrepo"}Adding a mount also re-arms the file watcher over the new root and reconnects any
MCP servers whose command line refers to ${mounts}, so both see
the folder immediately.
Removing a mount (the × on its root row, or DELETE /api/mounts/<name>) drops that line.
Nothing in the folder is touched — a mount is a pointer, not a copy, and LatchAI never moves
or rewrites the directory it points at.
What the agent sees
Section titled “What the agent sees”Inside LatchAI, the mount name is the first path segment. myrepo/src/index.ts routes to the
mounted repo; a path with no mount name in front resolves in workspace/. That is the same
addressing the file explorer, editor tabs, read_file, write_file, edit_file,
multi_edit, list_dir, grep, glob, search_code, and run_shell’s cwd all use, so
a path you can see is a path an agent can name.
Every agent prompt opens with a Filesystem roots block naming the workspace and each
mount, because the one thing a file-tool call cannot succeed without is knowing what root
it is in. That block also says the thing models most often get wrong: having cd’d
somewhere with run_shell does not change what a file-tool path means.
Three resolution rules are worth knowing before you watch an agent work:
- A relative path that isn’t where it was asked for, but exists in exactly one other root, is read from there and the result says so. If it exists in two, the read is refused and names both.
- A write is never redirected. If the path doesn’t exist here but does elsewhere, the write fails and names the full path — silently writing into the wrong repo is real damage.
~/…and absolute paths are accepted and taken literally, provided they land inside a root. They are never probed against the others.
Your repo’s own instructions come along. When a mounted folder carries a CLAUDE.md,
an AGENTS.md, a .cursorrules, .cursor/rules/*.mdc, or a
.github/copilot-instructions.md, LatchAI folds it into the system prompt for agents and
chat, labeled by root — user tier (~/.claude) first, then the workspace, then each mount,
with the more specific tier winning a conflict. Each file is capped (48 KB per file,
96 KB per root) and any clip says what it dropped, so a partial instruction set never
reads as a complete one. Skills work the same way: <mount>/.claude/skills/ is a skill tier
alongside ~/.claude/skills/ and the workspace’s own.
The gate is on the way out, not on the way in. A path that resolves outside the workspace
and its mounts is refused before anything is read or written, and the refusal is a
permission.denied event on the canvas and in the events panel, not a silent skip. The
message names the roots so the next attempt can be right:
path is outside the permitted roots: ../../.ssh/id_rsa. Accessible roots: the workspace(plain relative paths); myrepo/ → /Users/you/repos/myrepo. Use a relative path,<mount>/<path>, or an absolute path inside a root.Symlinks are checked too — the real path of the target has to land inside one of the allowed roots, so a symlink planted in the workspace can’t be used to walk out of it.
Your first chat
Section titled “Your first chat”Open the assistant panel with ⌘⇧L. It runs on the same engine as everything else —
same provider, same tool registry, same filesystem — so it can read the repo you just
mounted, propose edits, and apply them. The file in your active tab is passed along as
context, and @ autocompletes a file path to attach its contents explicitly.
Try something that requires it to look around:
@myrepo/package.jsonwhat does the build script actually do, and is anything in scripts/ unused?
You’ll watch it work rather than wait on it: tool calls appear as rows in the chat and as
full entries in the events panel (⌘J), and if the model publishes a plan, the panel
grows a live to-do strip that ticks over as steps complete.
A shell command asks first. The permission card names the tool, previews the arguments, and
shows the rule it would write — Allow once, Always allow <rule>, Deny once, or
Always deny. The “always” answers persist to permissions.json. The picker at the left
of the chat toolbar switches the whole conversation between 🔒 Ask permission and
⚡ Allow all tools, and it applies to the turn already running, not just the next one.
One picker at the right decides who is answering — a model (anything in the
Models page Library, on this Mac or connected) or an
agent (any persona in agents/, so you can talk to the same reviewer your workflows
use). It leads with Default · <model>, which follows whatever is pinned in Models
rather than freezing today’s choice into the session.
The header buttons are ≣ chat history, + new chat, and ⧉ to move this conversation
into a full tab. Sessions survive engine restarts, because the envelopes live in
runs/chats/. Typing / in the composer opens the slash commands: /rename, /new,
/stop, /mode, and /help.
Because every chat turn is checkpointed, the panel’s ± Review changes affordance shows you exactly what the assistant touched, with a revert.
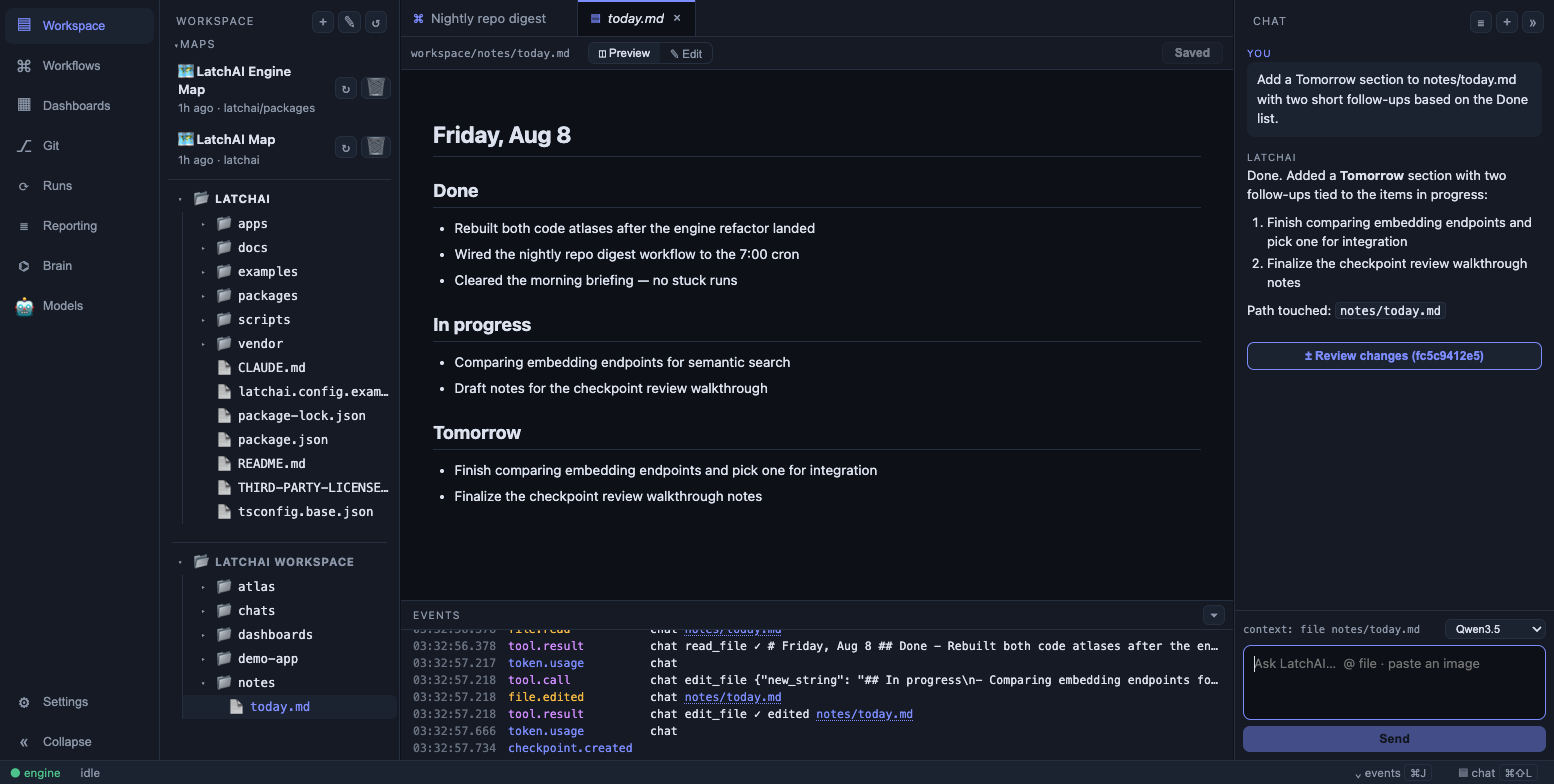
Chat, the editor, and the file tree are one process — the assistant edits what you’re looking at.
Your first workflow
Section titled “Your first workflow”+ in the Workflows sidebar (or the “New Workflow” command) scaffolds a draft with a
trigger node. From there: add nodes, drag between handles to connect them, click a node for
its type-aware inspector, and press ⌘S to save. Saving validates the graph server-side and
writes workflows/<id>.json — a plain file you can read, diff, and commit.
There are two ways to add a node, over the same catalog. A palette is docked on the canvas’s left edge with every type visible at once — drag a card onto the canvas and the node lands where you dropped it. The toolbar’s Add node ▾ picker is the keyboard-first half: open it, type three letters, press Enter. Both group the types into Triggers, Agent & review, Flow, and Data & web.
Step by step, for the smallest useful thing — an agent that reads the repo you just mounted and writes notes into the workspace:
+in the Workflows sidebar. You getUntitled 1, onemanual_triggernode, and a dirty tab (● in the tab bar). Nothing is on disk yet.- Add an agent node and drag from the trigger’s output handle to the agent’s input handle to connect them.
- Click the agent node. The inspector is type-aware: give it a label, a prompt, and a tool allowlist. Click empty canvas instead and the inspector edits the workflow’s own name and description.
⌘S. The draft isPUTto the engine, validated against the workflow schema, and written to<latchHome>/workflows/untitled-1.json. A validation error comes back into the toolbar rather than writing a broken file.⌘⏎. The run starts, nodes light up as they execute, tokens stream into the node, andfile.writtenshows up in the events panel when the agent writes.
The file you just made:
{ "formatVersion": 2, "id": "repo-notes", "name": "Repo notes", "description": "Summarize a mounted repo into the workspace.", "nodes": [ { "id": "trigger", "type": "manual_trigger", "position": { "x": 60, "y": 180 }, "config": {} }, { "id": "summarize", "type": "agent", "label": "Summarize the README", "position": { "x": 340, "y": 180 }, "config": { "tools": ["read_file", "list_dir", "write_file"], "prompt": "Read myrepo/README.md, then write a three-bullet summary of what this project is to notes/myrepo.md." } } ], "edges": [{ "from": "trigger", "to": "summarize" }]}Four things in that document are worth knowing. "formatVersion": 2 is required on every
workflow — it is the only format there is, and a document without it is rejected at load.
id is a filename (workflows/<id>.json), so it may not contain a slash or start with a
dot. tools as an array is an allowlist; true means every registered tool, [] means
the tool loop with nothing callable, and omitting it entirely makes the node a plain
single-shot prompt with no tool loop at all. And any {{nodeId}} in a prompt interpolates
that node’s output — {{trigger}} is the run payload, or {{state.trigger}} for whichever
trigger fired, which is how a manual run, a webhook body, and a cron fire all reach the same
agent. An unresolved {{ref}} fails the node rather than surviving as literal text.
The { } JSON button in the toolbar toggles the canvas for the raw document. Both views
project the same draft, so an edit in one shows up in the other, and invalid JSON shows
its parse error instead of committing.
⌘⏎ runs the workflow, saving first if the draft is dirty, because the engine runs the
file on disk rather than the buffer in your browser. (If the trigger declares
config.params, LatchAI asks for them first and the trigger’s output is an object —
{{trigger.version}}.) The same run, headless, from a clone:
npm run run ~/LatchAI/workflows/repo-notes.jsonOnce a graph does real work, give its risky steps a policy: every node accepts retry,
timeoutMs, and onError (fail, continue, or branch down an error edge), and a
workflow can name an errorWorkflow to fire when it fails. See
Workflows.
The workflow-builder agent
Section titled “The workflow-builder agent”You do not have to draw the first graph yourself. A fresh home seeds
agents/workflow-builder.md — an agent whose whole job is turning a plain-language
automation request into a valid workflow. Pick it in the chat panel’s agent picker and
describe what you want.
It works to a fixed order: ask at most a question or two if the trigger or the success
condition is genuinely unclear, call list_node_types to read the real node catalog before
drafting, call validate_workflow and fix every error it reports, and only then call
save_workflow. It will tell you the workflow id and what it built.
One behaviour to expect: a workflow with a trigger is saved disabled. Nothing it writes can fire on a schedule until you open it on the canvas, read it, and enable it yourself.
Troubleshooting
Section titled “Troubleshooting”The agent says it can’t find your repo. It is addressing a path outside its roots. Ask
for list_dir on . in chat — the top-level entries are the mount names plus the
workspace’s own contents, and whatever isn’t in that list isn’t reachable. If the mount is
in mounts.json but not in that list, either the file was edited by hand while the engine
was running, or the folder it points at has moved: restart the engine, then re-add it.
Search doesn’t find a file you can see. ⌘⇧F searches the workspace and every mount,
but it skips dotfiles and node_modules, dist, build, .next, and coverage.
Where to go next
Section titled “Where to go next”- Workflows — the node types and the canonical format.
- Triggers — make the workflow run without you.
- Agents — turn a good prompt into a reusable persona.
- Checkpoints & review gates — put a human in the loop.
- Projects & work items — give the agents a board to work from.